


TWO-PAN METHOD GUIDE
A time and cost-effective way to bake bread in bulk at home


If you’ve been on a sourdough journey, you know that baking a perfectly crusty loaf isn’t as simple as tossing dough into the oven.
Steam is one of the most important factors when it comes to baking sourdough bread, but creating a steamy environment might be challenging to manage by home bakers wanting to bake several loaves of bread at once in their home ovens. This is why I have popularized the Two-Pan Method of Baking Sourdough Bread.
This method is perfect for bakers looking to make multiple loaves at once, maximize oven space, and simplify their baking routine—all while achieving a gorgeous crust and airy crumb.
I am not exaggerating when I say this method has changed the lives of thousands of home bakers.
I receive multiple messages every week from bakers who are so thankful this method was brought to light. To them, using this method means they don’t have to spend thousands of dollars on an expensive bread oven, wake up so early to bake or spend whole days in the kitchen lugging heavy iron pots in and out of the oven. It means they can increase their production and make more money, while having more time to spend with their family or to run different parts of their business.
The Importance of Steam in Bread Baking
Steam plays a vital role in the process of baking sourdough bread as it enables the dough to expand fully and achieve the desired "oven spring" by maintaining moisture on the outer crust during the initial baking phase. This prevents premature setting, resulting in a better crumb structure and a larger loaf compared to baking without steam. Essentially, steam provides the necessary time for the dough to rise adequately before the crust forms.
Maximizes oven spring: Steam creates a humid environment that prevents rapid surface drying of the dough, allowing for significant rising before the crust hardens.
Improves crumb structure: Proper steam distribution facilitates even expansion of the dough, resulting in a more open and airy crumb.
Enhances crust appearance: Steam aids in sugar gelatinization on the dough's surface, leading to a shiny, crisp, and well-browned crust.
Improves scoring: The presence of steam enables the scored cuts on the dough to expand and open up effectively during the baking process.
Traditional Methods of Adding Steam
Professional Bread Ovens: Bakery ovens come equipped with steam injection systems.
Dutch Oven or Cast Iron Pot: These heavy-duty pots or cloches trap steam released from the dough itself, creating a perfect mini-oven environment.
Open Baking with Steam Trays: Home bakers using standard ovens often resort to adding a tray of boiling water or spraying the oven walls with water to generate steam.
The Downsides of Those Methods
Professional Ovens: Out of reach for most home bakers due to cost and space constraints.
Dutch Oven or Cast Iron Pot: While effective, they’re big, heavy, bulky, expensive, and limit you to two loaves at a time.
Open Baking with Steam Trays: Inconsistent results. Unless you’ve mastered this approach, you might risk setting the crust too soon, leading to minimal oven spring and a dense crumb. The crust can brown too quickly—or even scorch—while the interior remains undercooked. This often forces you to remove the bread early, leaving you with an unevenly baked loaf.
Gas Ovens: Their design, made to vent heat and steam out to prevent the buildup of moisture and maintain proper combustion, makes it difficult to retain the steam and high heat required for sourdough baking, resulting in loaves that struggle to achieve proper oven spring or a well-developed crust.
The Birth of the Two-Pan Method
This method was discovered purely by chance. In the midst of growing my home bakery, I knew I had to increase the amount of loaves I baked per hour in my home oven. I came across content from Haley who open baked several at once using loaf pans.
I bought four loaf pans to try open baking but for my experiment I had only made enough dough for two loaves. Staring at the extra two pans, I thought: “Why not use them as lids to trap steam?”
It worked! The bread came out beautiful and my family enjoyed it even more than they did my sourdough dough boules. That shape made it easier to store, slice, and use for breakfast toast or lunch/dinner sandwiches. I knew my customers would love it better too!
I shared my excitement on a Facebook group for micro bakers. To my surprise, while a ton of bakers were impressed, wanted more details, and were excited to try it right away, 2 or 3 bakers chimed in with “I’ve done this before.” My thought was: “If no one is talking about this, I will”.
I started sharing about it on my social media, and wrote down all of the details, turning it into a method that would be easy to replicate by anyone in the world.
I have loved watching hundreds of home bakers try out my Two-Pan Method, sharing their great results and how their bakeries are flourishing because of it!


and like these I have hundreds of messages! Thank you for sharing with me! I love to hear from you!
What Is the Two-Pan Method?
The Two-Pan Method is a simple, budget-friendly solution for baking sourdough bread at home with bakery-quality results. By using two identical loaf pans—one as a base and the other as a lid—you can create the ideal steamy environment for your dough without needing expensive, heavy cast iron pots or a professional steam-injected oven.
But how does it create the ideal steamy environment? Similar to how a Dutch oven (cast iron pot) works, the top loaf pan traps the dough’s natural moisture, creating a steamy micro-environment without needing additional water trays or misting.
This method works in both electric and gas ovens because the pans seal off the dough from the oven’s venting system, retaining steam and heat where it’s needed most.
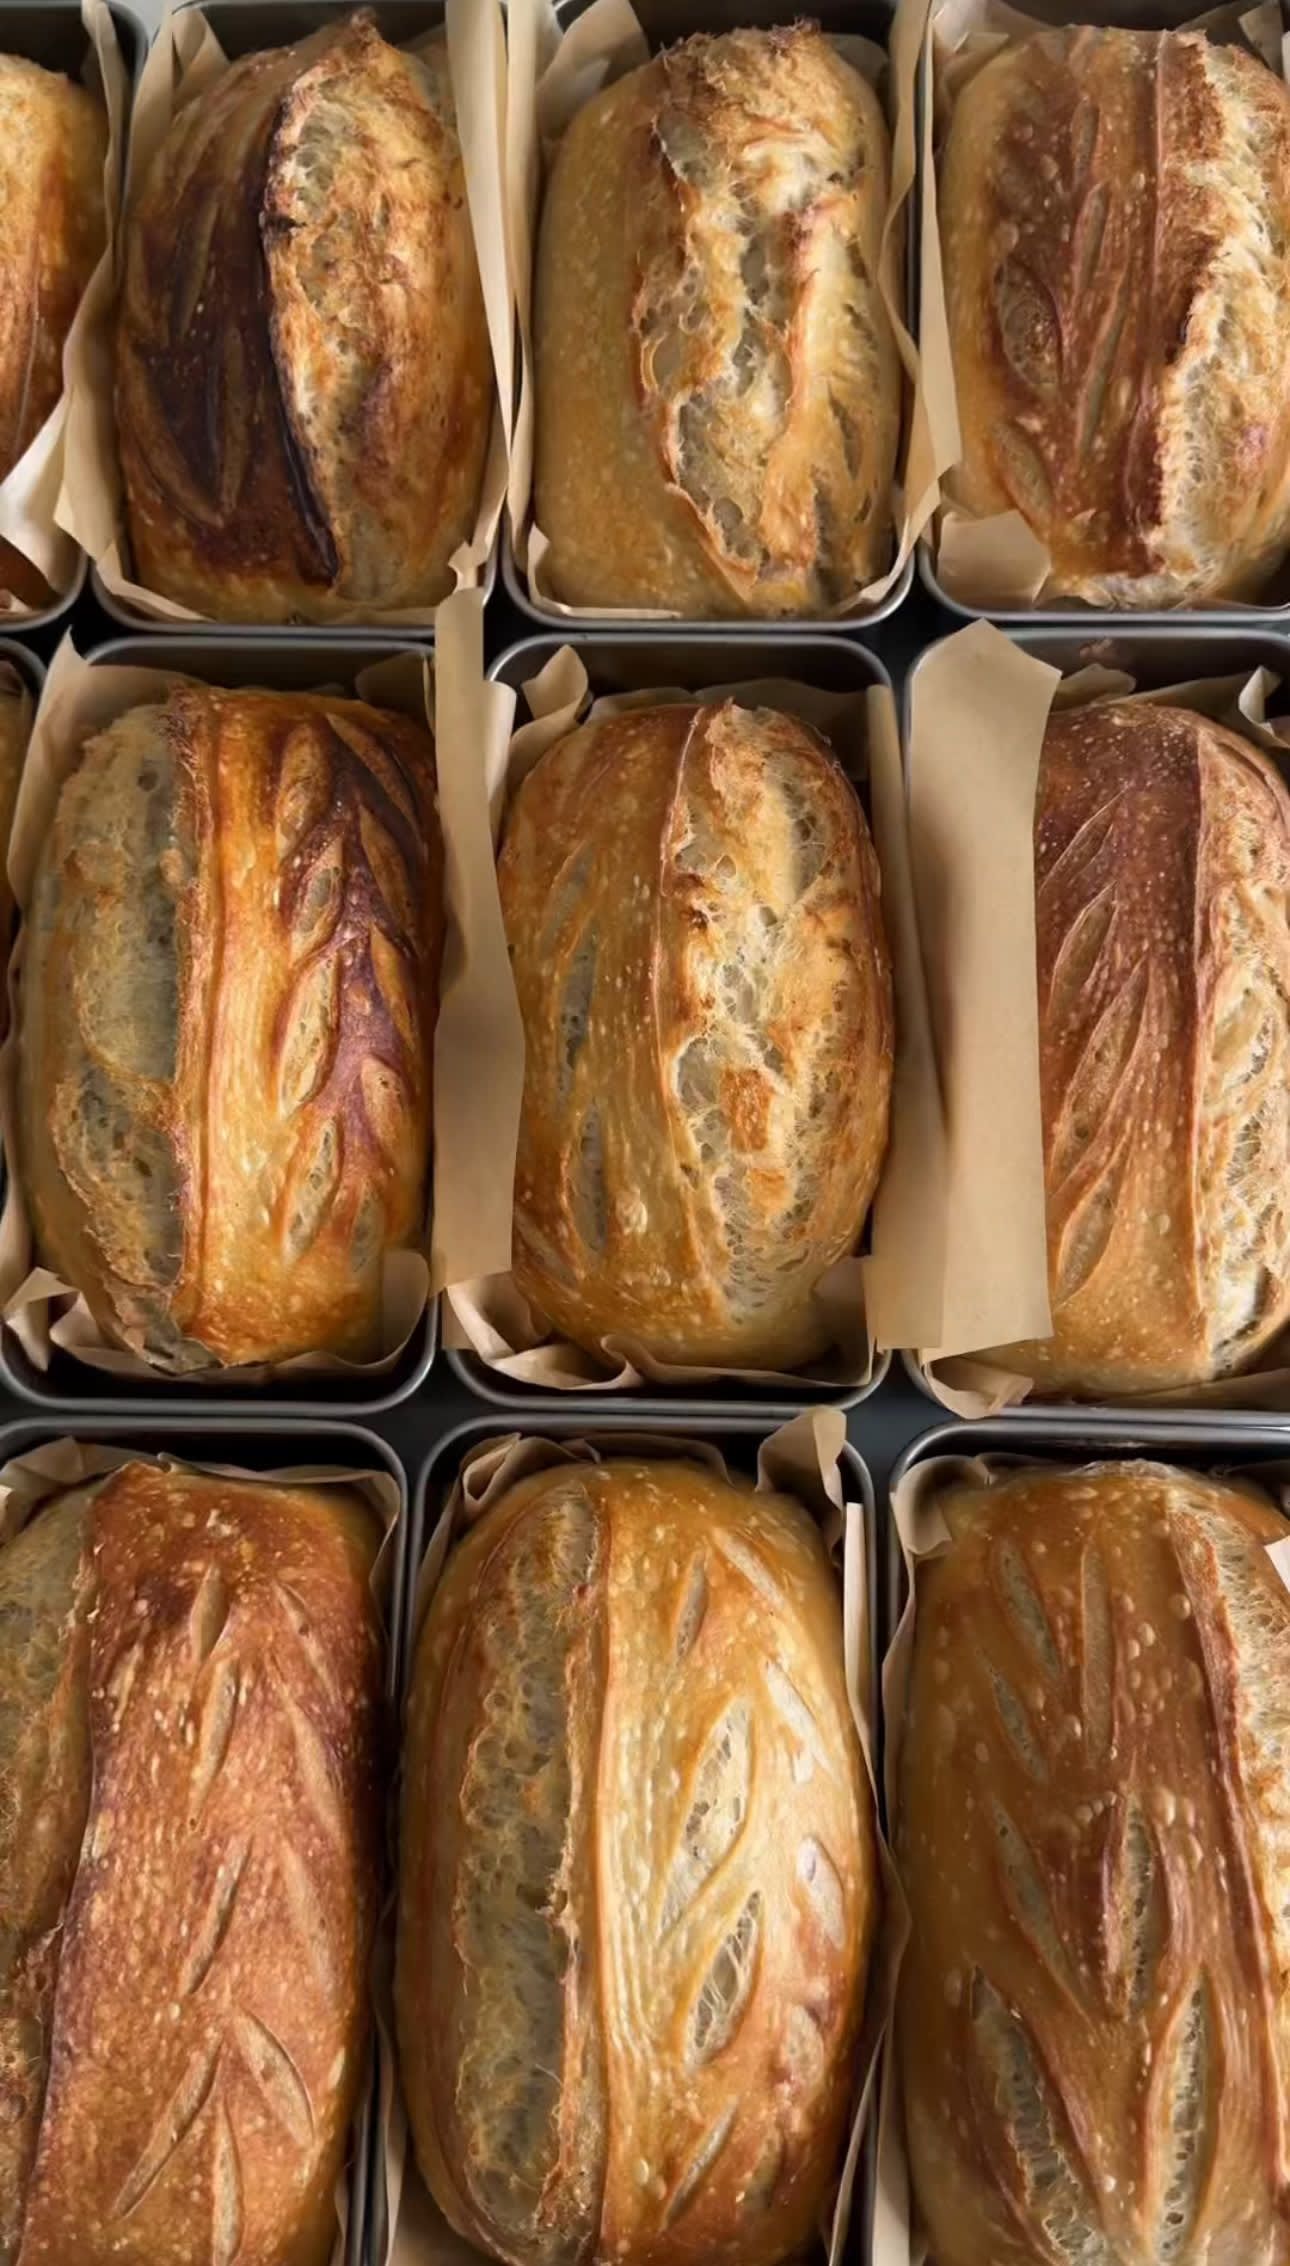
Most store-bought bread gets its uniform shape and size from being baked in loaf pans, making it perfect for slicing and using —ideal for mass production and consistent presentation. The Two-Pan Method helps you achieve those results.
The Two-Pan Method creates similar loaves to those baked with rectangular Pullman loaf pans with their signature lids. Bread baked in Pullman loaf pans are very uniform with a soft crust, ideal for sandwich bread or precise slicing. While the Pullman method isn’t as versatile for artisan-style sourdough with a crispy crust, it’s another great option for baking in bulk—especially if you’re aiming for consistent shapes and sizes.

What You’ll Need
1. Loaf Pans
Quantity: You’ll need two pans for each loaf you plan to bake.
Type: Stainless steel pans are highly recommended for durability and avoiding non-stick coatings with harmful chemicals.
2. Greasing the Pans
To prevent sticking, it’s essential to grease your pans well or line them with parchment paper.
Best Oils:
Avocado Oil: Ideal for its high smoke point (up to 500°F).
Coconut Oil, Butter, or Ghee: Also effective and add a hint of flavor to the crust.
How to Grease:
Spray the oil, then use a napkin or paper towel to spread it evenly.
Ensure every corner and edge is coated to avoid sticking.
Alternative and my preferred method now:
Use parchment paper to line your pans. It’s affordable, guarantees easy release, and makes cleanup a breeze.
Remember to like this article if you find it helpful and leave me a comment with questions and ideas on what you want me to write about next
Step-by-Step Guide to Using the Two-Pan Method
After the first rise or bulk fermentation, divide the dough into 900 grams pieces and shape them into batards and place them seam-side down in greased or parchment-lined loaf pans.
I put 900 grams of plain dough or about 1200 grams or so of dough with inclusions. This is because inclusions will weigh down the dough, limiting its oven spring and overall volume—so the extra dough helps fill the pan and gives you a tall, gorgeous loaf despite the added weight.

Cover the pans with a clean cloth to prevent the surface from drying out.
Proof in the refrigerator to retard fermentation and obtain deeper flavor, or on the counter for faster fermentation and milder flavor.
Preheat your oven to 450–500°F. Every oven is different so it's up to you to experiment and play with the temperature until you find what works for you, your recipe and your oven.
Position your racks to fit as many loaves as possible while maintaining good airflow.
Just before baking, score the dough with a sharp blade to control the expansion and give your loaf a beautiful finish.
Place an identical loaf pan upside down on top of the dough-filled pan to act as a lid. I recommend you grease this loaf pan as well, but it's optional. I find that my loaves with inclusions might stick to the top loaf pan some times.

Bake for 30 minutes, allowing the dough to rise in a steamy environment.

Remove the top pan after the initial 30 minutes, and bake for an additional 15 minutes or until the loaf is golden brown with an internal temperature of 205°F.

Remove from the oven and immediately take the loaf from the pan and parchment paper to allow the steam to scape and avoid soggy bottoms.

Place the loaf on a cooling rack to allow air to circulate.

Let the bread cool completely before slicing or bagging to prevent steam from creating a moist environment that can soften the crust and lead to mold. Fully cooled bread maintains its crunchy crust and stays fresher longer when stored correctly.


Scaling Up: Baking in Bulk
One of the biggest advantages of the Two-Pan Method is how easily it scales for bulk baking. Here’s how I bake up to 24 loaves at a time in my double wall oven:
Rack Placement:
Arrange racks to maximize space without compromising airflow. Experiment to find the setup that works best in your oven.

Initial Temperature:
Preheat the oven to 500°F. You need a higher temperature since you will be baking many more loaves at once.
Loading and Lid Handling:
Use silicone gloves for a secure grip and to prevent lids from slipping during loading and removal.
Be quick to minimize heat loss, but be calm. I find that when you hurry and worry too much about heat loss, you act nervously and the lids fall off.
Practice until you become confident loading the pans.
If you find the bottoms of your loaves get too dark, you might want to try adding a large baking sheet on the bottom of your oven, to act as a shield from the heat. Don’t do this if, on the contrary, your sides and bottoms are not getting sufficiently brown.
Temperature Management:
After loading the pans, turn off the oven, then immediately turn it back on to 500°F to trigger the preheating cycle for faster temperature recovery. I find ovens tend to reach the desired temperature faster under the preheating mode than if we wait for it to go back to temp on its own.
Set a timer for 30 minutes.
Removing the Lids:
Be quick when removing lids to minimize heat loss.
Use foil to cover the loaves on the top rack after removing their lids to prevent over-browning or burning.
Turn the oven off and then back on and set the temperature to 450°F.
Lately I have been baking at 500°F for the entire 45 minutes and I like better how my loaves come out, but remember: every oven is different! you have to experiment to find what temperature and timing works for your setup!
Set a timer for 10 minutes. Check and add 5 minutes at a time until they reach a golden brown crust. Because you are baking more loaves at once and losing some oven temperature in the process of loading and removing the pans, you might need to bake for a few extra minutes. This depends on your oven. I don't need to add extra time in my oven, but your oven might be different.
Inclusion Loaves:
Bake loaves with sweet or sticky inclusions (like fruit or cheese) on the bottom rack to avoid drips onto other loaves. But if your oven runs hot on the bottom rack, you might want to bake them on the top rack. It's up to you and your oven.
Batch Baking:
After baking, let the oven return to 500°F before loading the next batch.
Always check that each loaf reaches an internal temperature of 205°F before removing from the oven.
If you want your loaves to come out darker, try baking at a higher temperature or longer.
If they are browning to soon, try lowering the oven temperature or reducing the baking time.
Useful Links
Essentials for making sourdough in bulk
Silicone Oven Gloves (Use code MARIA15 to get 15% off)
The mixer I recommend for making sourdough bread (and other treats/bakes) in bulk. Note: I do not recommend getting a large mixer until you are consistently making 100 loaves of bread per week and committed to continue.
Here you can find videos I have shared on the Two Pan Method.
Here and here you can find posts and stories that I have saved from other bakers trying the Two Pan Method successfully.
If you love my content, please consider sharing it with friends and family. Every share helps spread this movement — and as a thank you, you’ll unlock even more exclusive recipes and behind-the-scenes content.